Friday, October 31, 2014

Happy Halloween!

Hello Dreamers,
Happy Halloween!  We should be having lots of Trick or Treaters here tonight.  Unfortunately, the weather is not all that great.  But, that should not get between  kids and the chance at all the treats.
I made a few special treat bags for my neighbors.  I wanted to make something a little special.  So, I made a batch of chocolate chip cookies-half with milk chocolate chips and half with white chocolate chips.  After the cookies were baked and cooled, I dipped one end in melted chips and added sprinkles.  The cookies look pretty festive!

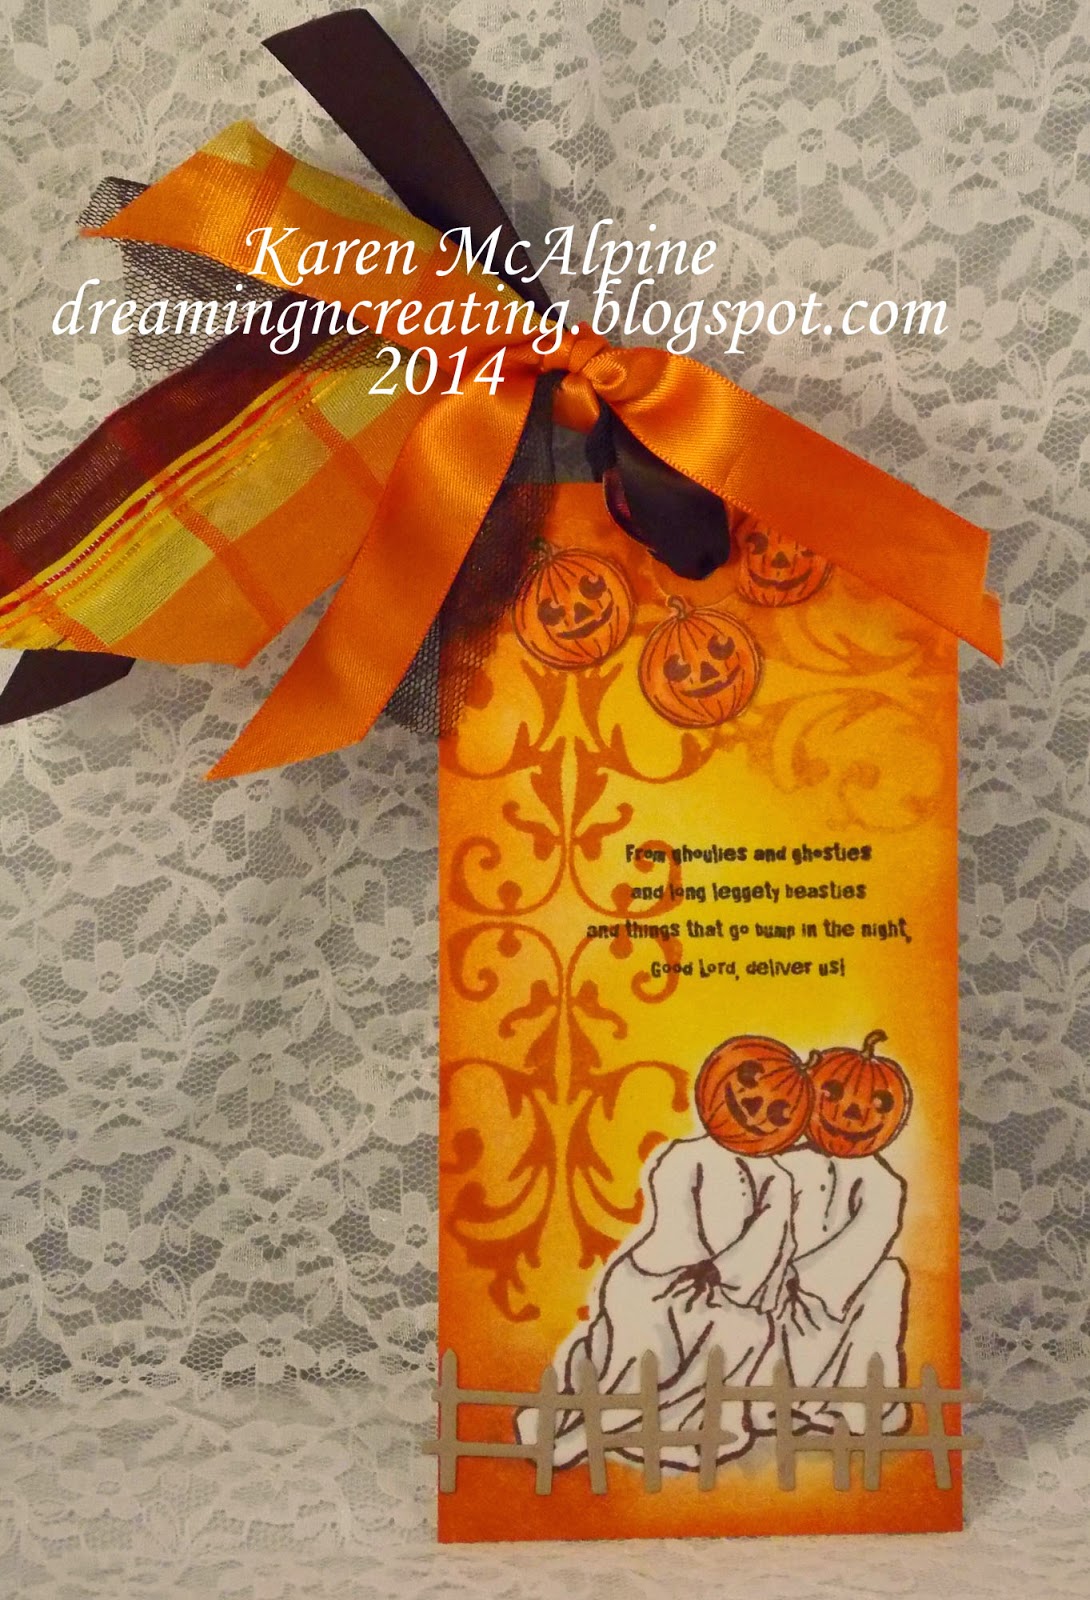
Now, on to the cards for today.  Halloween cards made with a super fun stamp from The Stampsmith.

Card One


Materials:
CS: Glossy white, orange, purple, and green
DP: Halloween papers
Ink: Tuxedo Black Memento: Spiced Marmalade Distress Ink
Stickles
Rick Rack
Crazy Mesh
Tulle
Ribbon


Instructions:

  • Make cards from the orange CS and layer with DP
  • Stamp the image on glossy white CS and distress edges and background with distress ink
  • Layer image and add to card
  • Add the fibers and Stickles

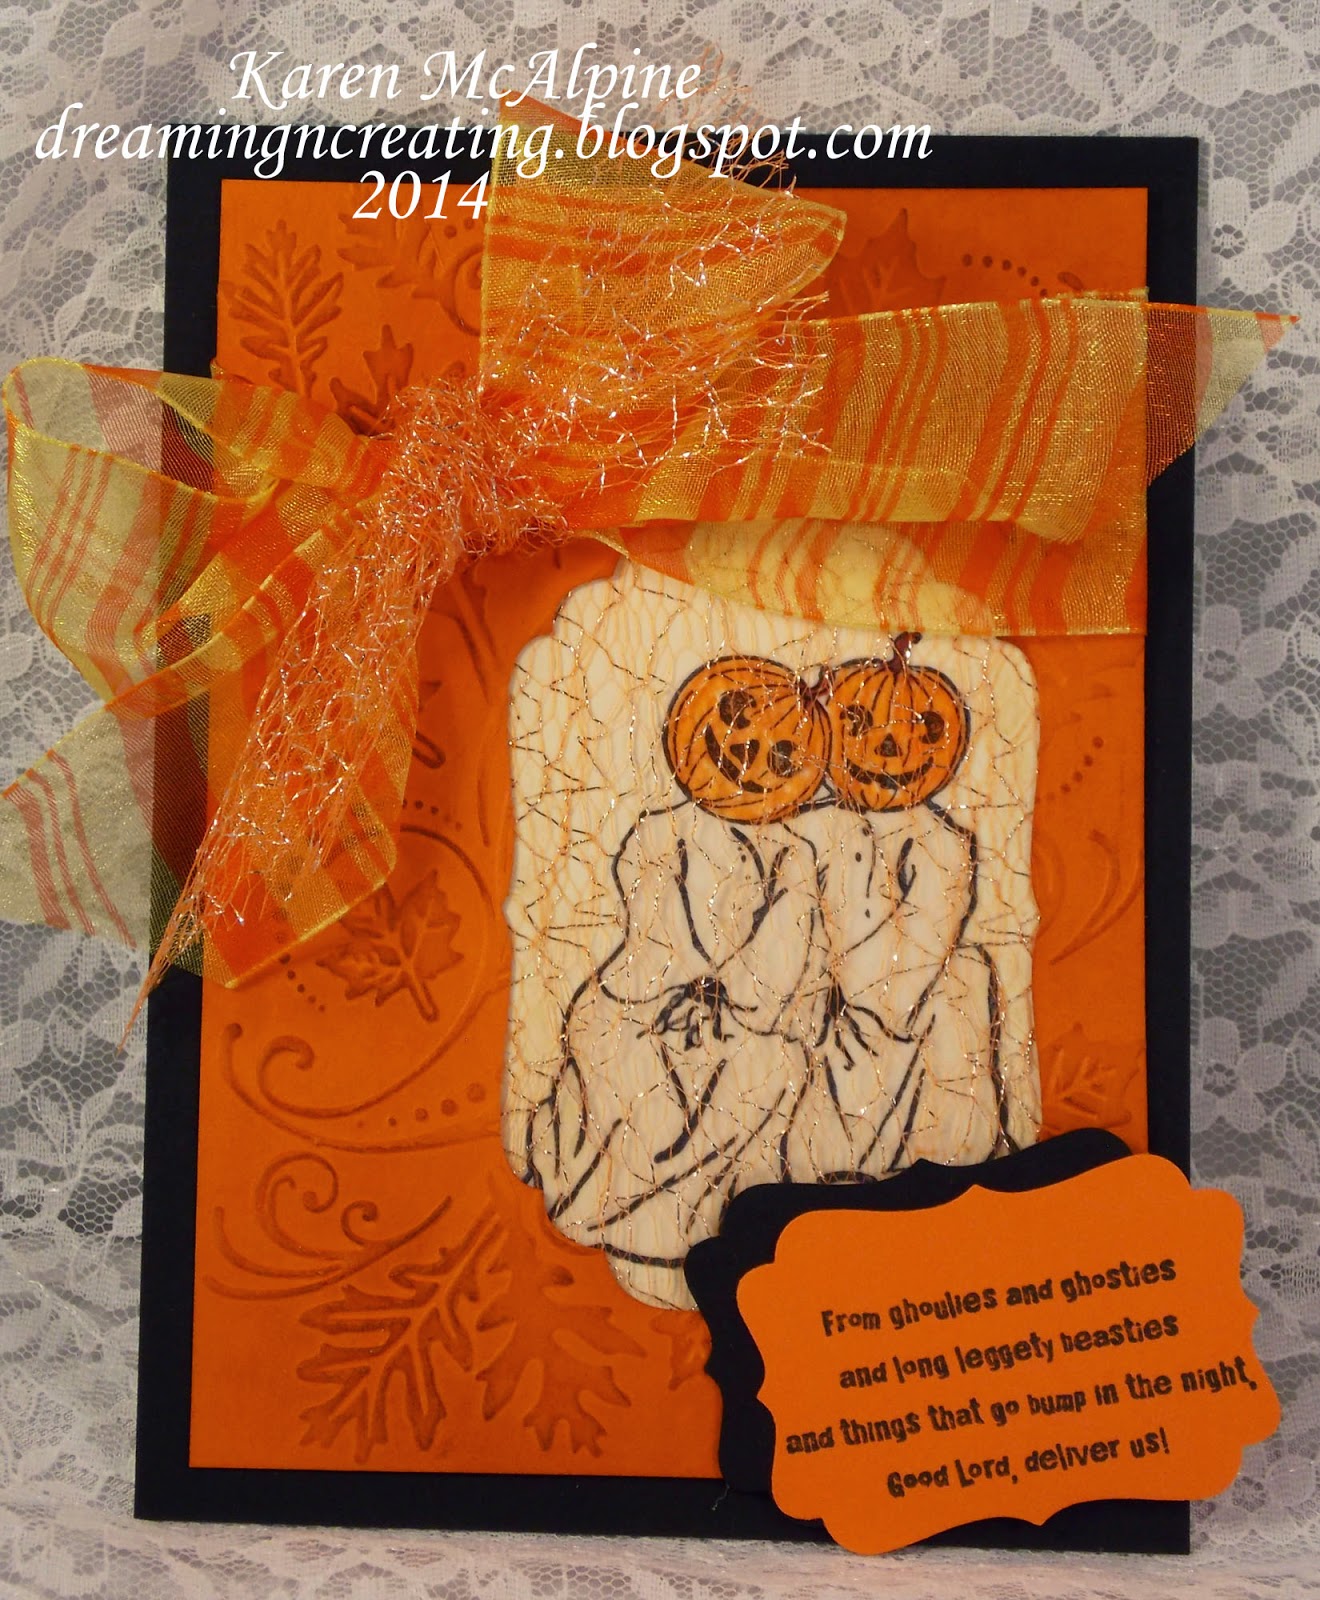
Very easy and quick! Here is a second version:


Challenges for Scary Halloween Lady:
It's All about the Vintage: anything goes
DL Art Linky: Halloween
4 Crafty Chicks: anything goes
Simon's Wednesday: anything goes
Left of Center:Halloween
Brown Sugar: anything goes
Chocolate, Coffee, cards: Halloween
Crafty Catz Weekly: anything goes

Well, that's all for now.  I have a cute birthday card-- I think I will show you that next.  Also have something with Lost Coast Designs coming up.  So, see you next time for more crafty goodness.  Love ya
Karen

Thursday, October 30, 2014

Halloween Leaves

Hello Friends,
Don't have any Halloween stamps?  This card show that you can adapt a fall stamp to make a Halloween card.  Take a look.


Materials:
Stamps: Fall Scene (retired) - Stampin Up; Sentiments - My Sentiments Exactly
CS: orange, black, white
DP: Halloween - Authentic
Inks: Orange and green Distress inks; Kaleidacolor ink pad; black dye ink
Orange and Green Markers
Sheer Ribbon
Stickles


Instructions:

  • Make card from orange CS
  • Layer with DP and black CS
  • On white CS, stamp the Fall scene--use markers to ink the stamp or a Kaleidacolor ink pad -- I used markers on this sample and the Kaleidacolor pad on the samples in the group photo below
  • Layer the image with black, orange, and white CS
  • Stamp a leaf and cut out; add with dimensional adhesive
  • Tie with ribbon and add Stickles


  • On inside of card, stamp sentiment and distress with inks
Hear a couple more versions of this card with different papers. 


Challenges for my Halloween Leaves:
Glitter and Sparkle: Halloween
Crafting by design: Halloween
Simon's Wednesday: anything goes
Tuesday Taggers: colors of Autumn

One more Halloween Card tomorrow!!  Hope you are having fun looking at the cards!!  See you tomorrow!  Love ya
Karen

Wednesday, October 29, 2014

Halloween Couple? Scary!

Hello Everyone!
I have a couple more Halloween cards to share.  I used a digi image from Dr. Digis House of Stamps to make this fun card.


Materials List:
Stamps: Made For Each Other - Dr Digis House of Stamps; Sentiment - That's The Ticket from A Muse Studios; Sentiment on inside of card - My Sentiments Exactly
CS: Solar White Neenah; Purple; green
DP: Spider Web from A Muse Studios
Distress Inks: Black Soot, Seedless Preserves
Copic Markers
Wonky Rectangles die - Spellbinders
Ticket Die Cut - A Muse Studios
Black Tulle


Instructions:

  • Make a card( 5 x 6.25 inches) from purple CS and layer with Cob Web paper
  • Print digi and let dry
  • Color digi with Copic Markers
  • Die cut the image and distress the edges with distress inks
  • Die cut a green rectangle and layer with the image


  • Stamp the ticket and sentiment
  • Die cut ticket
  • Wrap tulle around the card and add the ticket sentiment
  • Decorate the inside


Challenges for my Halloween Couple:
Stamped Blessing Amusing Challenge: anything goes
Crafty Card makers:  cut it out
Dream Valley: Halloween

Fun card!  I have two more Halloween posts.  The Halloween leaves  is up next - tomorrow!   See you then!!  Love ya
Karen

Saturday, October 25, 2014

Halloween Pumpkins

Hi Dreamers!
Having a pretty good weekend.   Spent the day at a stamp camp making cards.  Thought I would take a few minutes and share more of my Halloween cards.  I used some older Stampin' Up stamp---you may have these in your stash.  I picked them up used last winter.  I still have fun with them--even if they are retired.


I will spot light the pumpkin cards today--and save the Leaves for the next post.

Materials:
Stamps: pumpkins - Stampin Up; Sentiments - My Sentiments Exactly
CS: orange, green, brown, white
Inks: Orange and green Distress inks; black dye ink
Orange and Green Markers -Stampin' Up
Stickles


Instructions:

  • Make card from orange CS
  • Layer with green CS
  • On white CS, stamp the pumpkins masking the largest pumpkin
  • Highlight the lines of the stamp with the markers
  • Add the distress inks and add to card front


  • Stamp sentiment and distress with inks
  • Wrap sentiment with ribbon and add to card
  • Add Stickles
  • Decorate the inside


*****************Challenges for my Pumpkin Halloween Card:
Crafters Cafe: Spookable
Creative Moments: anything goes-twist--Halloween, fairies, spellbound
Fresh Brewed Designs: pumpkins
The male room: masculine and Halloween

That's it for me tonight!  See you next time for the Halloween leaves card.  Have a great weekend!!  Love ya
Karen

Friday, October 24, 2014

Halloween Card made with a Napkin

Hello Dreamers!
How has your week been?  I have had a fairly busy week.  My husband's band has a concert tonight.  And, then I have a card making day tomorrow.  I wanted to show you the Halloween card I made using a napkin.  I saw the napkins at Jo Ann Fabrics and thought it would make a cool card.  Here is what I did:


This card was pretty quick and easy to make--would be great for multiples.

Materials:
Halloween Napkin- Jo Ann Fabrics
Happy Halloween banner from Halloween stack - K & Company
CS: black and orange
Stamp: sentiment on inside of card-My Sentiments Exactly!


Instructions:
  • Make a card from orange CS and layer with Black CS
  • Separate the layers of a napkin
  • Tear the napkin to size to fit the card
  • Glue the napkin to the card --I used Pioneer glue stick
  • Add the banner


  • On the inside, tear a piece of white CS and use some of the napkin to decorate the inside
  • Stamp the sentiment with black ink
******************Challenges for The Raven Halloween Card:
Crafts 4 eternity: Halloween
Brown Sugar: anything goes
Jo's scrap shack: Haunted wishes
Left of Center: Halloween
Snarky Stampers: Halloween


Well, I better get moving and get ready for the concert tonight.  I have to go drink some coffee to get me motivated!  See you next time with more Halloween projects!!  Have a great weekend.  Love ya
Karen

Monday, October 20, 2014

Halloween Fun with Love to Scrap Challenge

Hello Dreamers!
Time for a fun new challenge on the Love to Scrap Challenge Blog!!!
The theme for the next two weeks is:

Seeing Dots

Make a project with stamping and add polka dots

We have two fabulous sponsors for this challenge!!!!

Prize: 2 images of choice to winner

Dr. Digi's House of Stamps


Prize: 3 images of choice to winner


Lacy Sunshine Stamps


I am continuing the Halloween theme this week with a fun card made with a digi from Dr. Digi.   I will be sending this card to my nephew and his lovely new wife.  I just love to send out the cards I make!  


Materials List:
Stamps: Made For Each Other - Dr. Digi's House of Stamps
Tag and Sentiment - A Muse Studios; Sentiment - My Sentiments Exactly (on inside of card)
CS: Solar white Neenah; Blue and Purple - Bazzill
DP: Authentic - Thrilling pad
Ink: plum - Memento
Distress Inks: Black Soot. Barn Red, Spiced Marmalade, Seedless Preserves
Copic Markers
Tile Works die - Spellbinders
Ticket die Cut - A Muse Studios
Starry Night Stickles
Purple and Orange ribbon


Instructions:

  • Make a large card from Purple CS ( 5.75 x 7 inches) 
  • Layer with light blue CS and polka dot DP
  • Print out the digi on Solar White CS and color with Copic markers
  • Die cut the image
  • Layer the different distress inks on the die cut piece
  • Add to card front


  • Add ribbons
  • Stamp the sentiment and ticket on white CS with plum ink and cut with die
  • Distress edges and add to card with dimensional adhesive
  • Add Stickles to blue CS


  • Decorate the inside


*************************************
Entered into the following Challenges:
613 Avenue: anything goes with optional candy treat
Stamping Sensations: warm autumn colors
Vandicrafts: fashion your background
Sister Act: anything goes
Crafty Bowz: anything goes with a bow
Dream Valley: Halloween

See you next time for more Halloween fun.  I made a card using a napkin....That is up next time!!  Love ya.
Karen

Sunday, October 19, 2014

Halloween Fun with Spooky projects

Hi Dreamers!
Hope you are having a great weekend!  I have been working on Halloween cards recently.  And, as Halloween is fast approaching, I thought I had better get them posted.  So, it will be Halloween for the next few posts.  I may throw in something not Halloween now and then too---just so you don't get bored.  LOL

The two projects shown today, use  stamps from Technique Junkies.  Technique Junkies acquired Stamp Camp Stamps recently and has added lots of new designs too.  You can also pick up their stamps at the large stamping shows around the country (like the Heirloom shows).

First a spooky Tag:


Materials List:
Stamps: Pumpkin Heads with Sentiment, Wrought Iron Panel all from Technique Junkies/Stamp Camp
Ink: Pumpkin Pie - Stampin' Up; Rich Cocoa and Tuxedo Black - Memento
Distress Inks: Spiced Marmalade, Dried Marigold, Mustard Seed 
Copic Markers
Fence Die Cut- A Muse Studios
Satin ribbons


 Instructions:

  • Make a tag from white CS
  • Stamp the Wrought Iron with Pumpkin Pie ink several times
  • Stamp the Pumpkin Heads with Rich Cocoa (stamp a few extra pumpkin heads to cut and use as embellishments)
  • Create a mask for the pumpkins and Distress the tag with distress inks
  • Color the pumpkins with Copic Markers
  • Stamp the sentiment with black ink
  • Add the ribbons


**********************************
A even spookier card:


Materials List:
Stamps: Pumpkin Heads with Sentiment, Wrought Iron Panel all from Technique Junkies/Stamp Camp
CS: Cream, orange, glossy black
Vellum
Ink: Stazon Black
Distress Inks: Spiced Marmalade
Pigment Markers - Vellum Writers from Zig
Spellbinders Die Cut
Label Punch - Stampin' Up
Fall Leaves Embossing Folder - Darice
Sheer ribbon
Crazy Mesh - Wyla 

 Instructions:

  • Make a card form glossy black CS
  • Dry emboss a piece of orange CS and highlight the embossing with distress ink
  • Die cut the opening in the embossed orange CS
  • Stamp the Pumpkin heads on vellum with Stazon ink
  • Color with pigment markers


  • Place a piece of the Crazy Mesh  and the stamped velum behind the opening in the orange CS
  • Add to the card base
  • Stamp the sentiment and punch out
  • Tie a bow in ribbon and add a piece of the mest


Fun projects for the little goblins in your life!  LOL......
***********************
Entered in the following fun challenges:
Allsorts: embossing
My Time To Craft: tag it
Open Minded Crafting: pumpkins and Jack-0-lanterns
Vintage Journey: to die for
Fussy and Fancy: orange and black


Be back tomorrow with a new Love to Scrap Challenge and more Halloween fun!!  See you then!!  Love ya
Karen

Tuesday, October 14, 2014

Love Birds

Hello Everyone!
Hope you had a great weekend.  We got a way for a bit this weekend to the great outdoors.  Visited Hartwick Pines State Park.  Lots of clean, fresh air and beautiful trees.  The leaves are just starting to change and the colors were gorgeous. Here is one picture that I took.   I have a few more photos that I will share in another post.

Hartwick Pines, Michigan


I made two more cards with the Splish Splash stamp and die set from Taylored Expressions.  See the other projects here and here.   I stamped the birds, hearts and flowers to make the love themed cards.  I think I may use them for Valentines.  That is a way off, but I can put them in my "to send" card box and they will be fine until February.  

Reminder: Taylored Expressions is sponsoring the Love To Scrap Challenge right now.  The theme is Anything Goes!!!!   You must stamp something and no digis are allowed for this challenge.

CARD ONE:


Materials:
Stamps:  Splish Splash stamp and die set from Taylored Expressions
Ink: Black die
CS: White;
Card One: Wisteria Wonder and Almost Amethyst from Stampin' UP
Card Two: Real Red and Crisp Cantaloupe from Stampin' UP
Polka dot embossing folder - Cuttlebug
Copic Markers
Red Stickles
Red Bakers Twine
Red and Lavender Ribbons


Instructions:

  • Make a white card 
  • Dry emboss white CS and layer onto the white card
  • Stamp the images and color with Copic Markers
  • Layer image with the two lavender CS's
  • Add to card
  • Tie ribbon in bow and add to card


 CARD TWO:


The second card is made the same way, except that I tied bakers twine around the stamped piece and added some red Stickles the the hearts.


Totally cute stamp set!!  So many ways to use this set.  And, you can make cards for any season.
*******************How about a few challenges for my Love Birds:
Paper Take Weekly: Super Fly-anything with wings
Through the craftroom door: anything goes
Cutie Pie: cute and Perfectly purple
The Paper Girls: use solid Cardstock

I am working a few Halloween cards right now.  These are cards that I will send out to my friends and family.  I will share a few of them as they are finished.  I am using some of my older stamps and a few new things too.  I am doing something with a Halloween napkin too........ Stayed tuned for that!!  Up next: A project from Lost Coast Designs--very owly.  See you then.  Love ya.
Karen

Saturday, October 11, 2014

Lovely Tag

Hello Dreamers!
Last month for my birthday, I ordered some stamps from Stampin' Up.  I just had to get them out and play around with them.  This tag is one of the projects I made.  I will, of course, share them all with you over the next two months.  (I made quite a few---are you surprised??!!)  


Materials List:
Stamps: Daydream Medallions, Background Builders, Fabulous Work of Art - all from Stampin' Up
CS: White, Crisp Cantaloupe from SU
Ink: Crisp Cantaloupe, Chocolate Chip from SU
Sheer Coral Ribbon


Instructions:

  • Make two tags: from white and Crisp Cantaloupe CS
  • Stamp the Background Builder and Sentiment in Chocolate Chip
  • Stamp Medallions in Crisp Cantaloupe ink
  • Distress edges with both colors of ink
  • Wrap the ribbon around the white tag
  • Glue the white tag to the Crisp Cantaloupe tag


This tag would be just perfect for a package, gift bag, or even to write a little note on the back.

************Challenges for my Work of Art tag
Mod Squad: tags
Card Makin Mamas: tags or mini cards
Dream Valley: anything but a card

Well, I better really get going now.  See you soon!  Love ya.
Karen

Owls in Nest with Lost Coast Designs

Hello Everyone!
Hope you are having a nice weekend.  I have been busy today doing this and that.  The roast is in the crock pot and will be ready for dinner later in the day.  So, now I have time to do a bit of blogging.  I made some fun cards with the new stamps Woodgrain Background and the Owl set from Lost Coast Designs. (Both stamps can be found in the NEW category.)

 My card for today also works for the October Lost Coast Challenge.  There is a $10 gift certificate up for grabs.  All you have to do is make a project using a Lost Coast Design Stamp and follow the theme.

The theme is Wings


Materials List:
Stamps: Woodgrain Background, Owl Set , and Yourba Adire Background all from Lost Coast Designs
Inks: Mossy Mixed Media; Rich Cocoa and Toffee Crunch  Memento
Distress Markers
CS: white, green, and brown
Burlap
Twine


Instructions:

  • Make a card from brown CS and layer with green CS
  • On white CS, stamp the Woodgrain background with Mossy ink 
  • On a second piece of white CS, stamp the owls with Rich Cocoa ink
  • Color owls with Distress Markers and cut out the owls
  • Stamp the Yourba Adire background stamp with Toffee ink and cut out one strip
  • Glue the strip to the background, wrap with twine, and add to card front
  • Add the owls and a piece of burlap ( this is the nest)


This would be a fun Halloween card or just an any time card.  I love the owls--they are so fun.  I have more of them coming up.


*********A Few fun challenges for my Owl in Nest:
4 Krafty Girlz: anything goes
Inspiration Destination: anything goes
Treasured Times Stamps: anything goes

Well, that's about it for now.  I will be back next time with a tag, more of the Taylored Expressions stamps, and another Owl card.  See you then.  Love ya.
Karen

Wednesday, October 8, 2014

More Cute Birds

Hello Everyone,
I am back today with another of the cute birds and bird bath cards.   I used the stamp and die set "Splish Splash" from Taylored Expressions to make this fun little card.


Materials List:
Stamps: Splish Splash stamp and die set from Taylored Expressions
CS: Solar White Neenah; Wisteria Wonder and Almost Amethyst from Stampin' Up
Copic Markers
Glossy Accents
Dimensional Adhesive


Instructions:

  • Make a 3.75 x 4.25 card from Wisteria Wonder CS 
  • Layer with Almost Amethyst CS


  • On Solar White CS, stamp the sentiment, bird bath, and bird
  • Color with Copic Markers
  • Add to card base


  • Add Glossy Accents to the bird bath water and water splash

************************************************
Challenges for my cute Bird Having a Bath:
Sparkles Forum: things with wings
A Random Fan: a hand colored image with monochromatic
Addicted to stamps:anything goes
Fan Tastic Tuesday: anything goes with wings


I will be back later in the week with two more cards made with this fun stamp set. I should have something from Lost Coast Designs too-it will also have birds.  See you later!!  Love ya.
Karen

Monday, October 6, 2014

Sweet Bird Bath -Love to Scrap Challenge Blog

Hi Dreamers!
Had a fabulous time in Niagara Falls, Ontario last weekend.  The wedding was so pretty and everything was decorated so beautifully.  The bridal party were gorgeous.  I had so much fun hanging with my husband's cousins, aunt and uncle!  Great time.
Now, down to business.  Time for a new challenge on the Love to Scrap Challenge Blog!!  The new theme is:

ANYTHING GOES

Make any project with stamping ---NO Digis Allowed for this challenge.

The fabulous sponsor for the challenge is:


!!!!!!!!!!Prize: Petite stamp set of the winners choice!!!!!!!

                       Taylored Expressions


For my design team project, I used a Taylored Expressions Petite stamp set with matching die called Splish Splash.  Take a look at this super cute set!!

                      Splish Splash with coordinating die


Here is my card.  Well, one of the cards I made so far, with this awesomely cute set.  I will show you more of the cards this week.


Materials List:
Stamps: Splish Splash stamp and die set from Taylored Expressions
CS: Solar White Neenah; Bashful Blue and Marina Mist from Stampin' Up
Copic Markers
Dimensional Adhesive


Instructions:

  • Make a  3.75 x 4.50 card from Marina Mist CS
  • Layer with Bashful Blue CS
  • On the Solar White CS stamp the Bird Bath and flowers
  • Color with Copic Markers
  • Add to the card


  • Stamp the bird and bird bath on a separate piece of Solar White CS
  • Color with Copic Markers
  • Die cut both with the Splish Splash die
  • Add the bird bath and bird to card with dimensional adhesive


Isn't this the cutest??!!!  I had a blast working with this fun set!  Head over the the Love to Scrap Challenge and link up for a chance to win a stamp set!!

***************************************
A few super fun Challenges for my Sweet Bird Bath:
Alphabet Challenge: Q is for quadruple - for of something-----I used four flowers
Anything Goes with a Twist: NEW Challenge blog---anything goes
Card Makin Mamas: mini cards - smaller that 4.25 x 5.50/ or tags
Sister Act: anything goes
Crafts 4 Eternity: three of the same letter ( you choose the letter) --My letter is B-bird, bird bath, blues
613 Avenue: anything goes
Glitter and Sparkle: anything with a B--bird, bird bath, blues
***************************************

Okay, see you later in the week for more cards made with this adorable stamp set!  I will also have something from Lost Coast Designs--maybe something spooky.  See you then!  Love ya.
Karen